In this lesson, you will learn how to access ChartTrader for order entry and configure it to suit your style of trading, as well as how to adjust and cancel trades directly from a chart.
Here is a chart that is already ChartTrader enabled and already has some submitted trades ready to execute in the event the live prices reach their targeted entry levels. Trades can easily be created by using these buy and sell Hot Buttons, and orders can be modified by using your mouse or by the Order Entry Panel below the chart display.
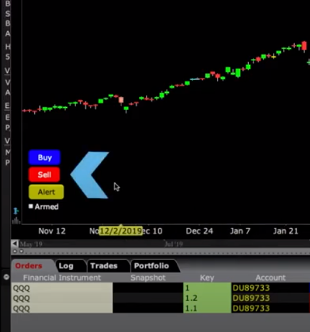
Ok, let’s access the View menu and disable ChartTrader so we can show you how to apply it.
Chart Configuration
Let’s start by opening Global Configuration within the Edit dropdown menu in the chart.
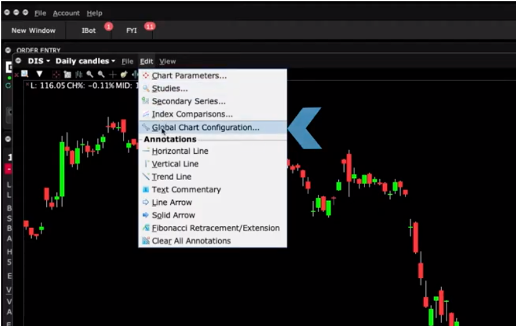
Expand the Charts section on the left and click on Settings.
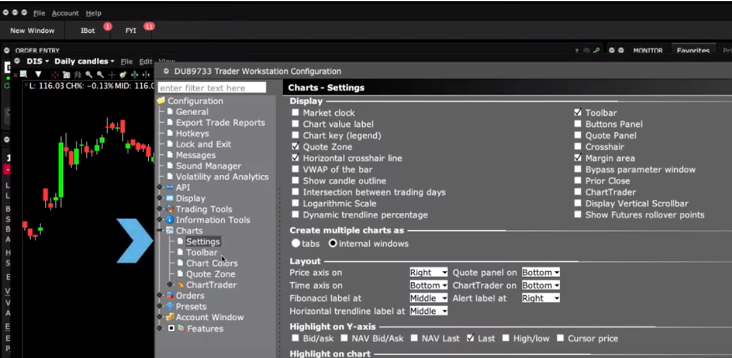
Then, check the box to enable ChartTrader.
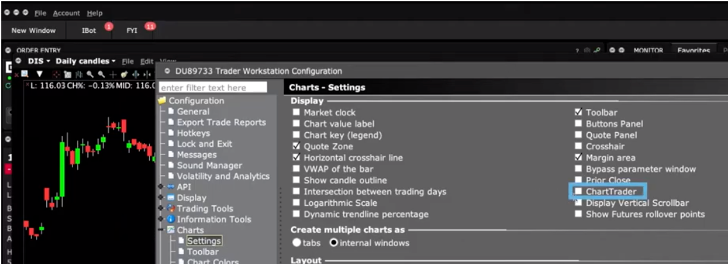
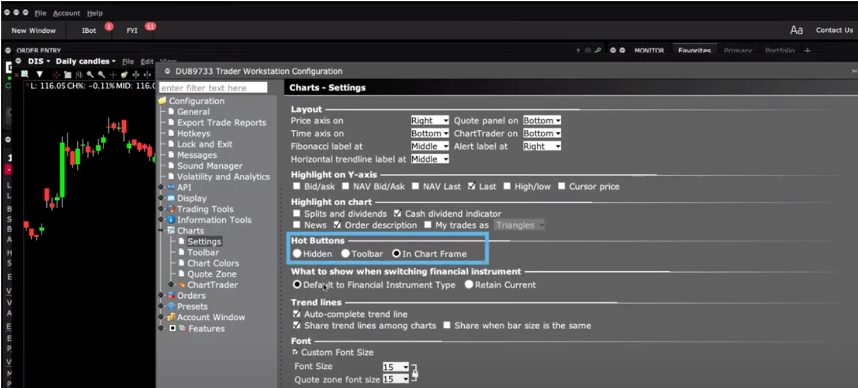
Before I close Global Configuration, please keep in mind that there are a couple of additional ChartTrader choices further down the page.
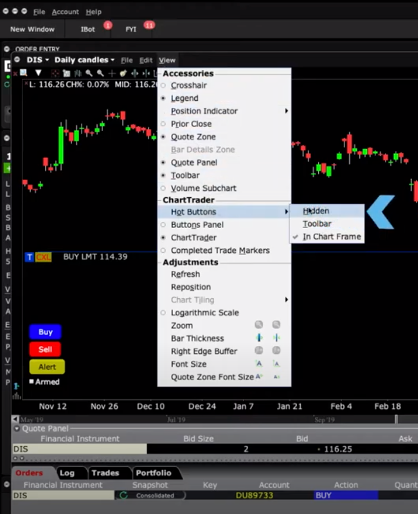
The Hot Buttons configuration highlighted here, is also available from the View menu on any chart.
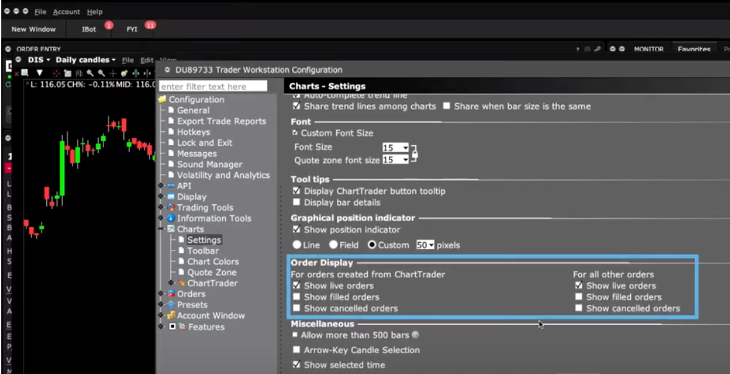
Under Order Display, you can choose what type of orders to display in ChartTrader and for within the activity panel.
And when you are really up to speed with ChartTrader, there may be advanced configuration features that you may decide to add to your charts.
The nerve center for those settings is accessible to the left under the ChartTrader. Expand the plus sign to reveal:
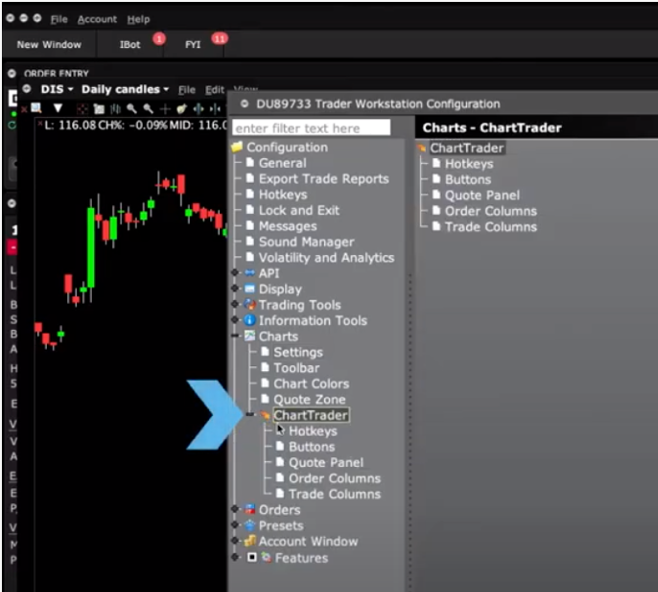
Hotkeys – Whereby you can configure keyboard and mouse shortcuts.
Buttons – Where you can turn on the buttons panel on the chart, plus edit or add more buttons. Let’s turn this on so you can see it display on the chart. If I click on the blue buy button – I can use the mouse to set the line on my chosen entry price.
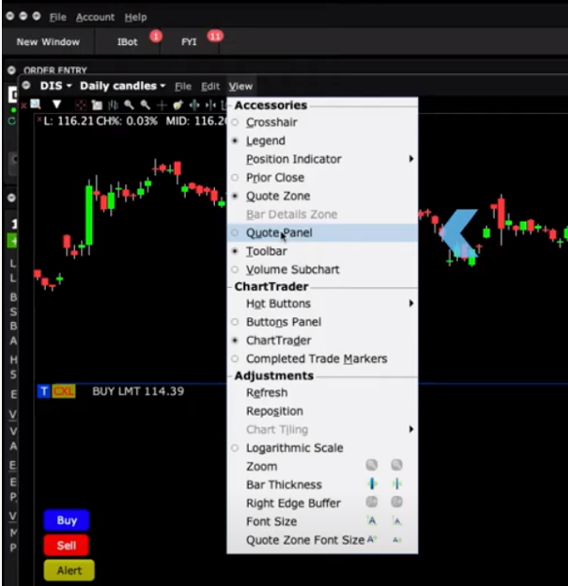
Quote Panel – This is where you can adjust the quote panel column headers plus modify the colors. Let’s add Unrealized P&L to the column list and click apply. If you don’t see the quote panel, just enable it under the View menu.
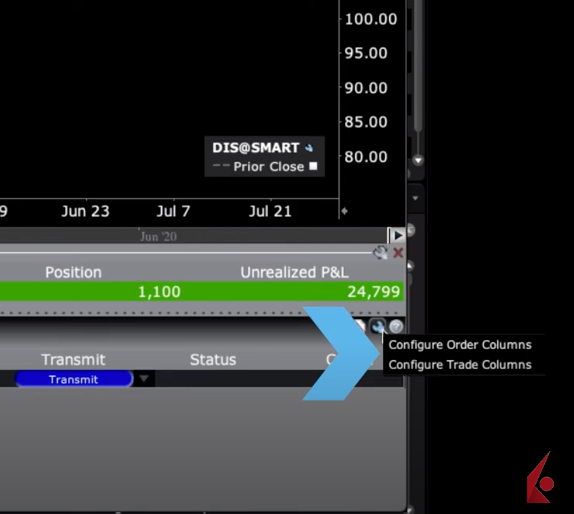
Next, Order Columns and Trade Columns – this is where you can add or remove order columns. Let’s add Filled and click apply. Now, you’ll see the filled column display.
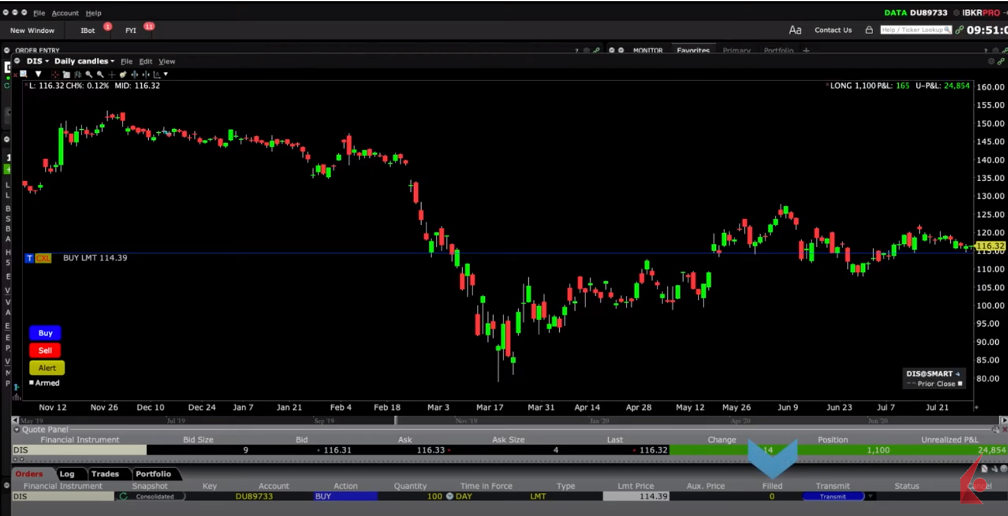
Since we added the buttons panel, I’ll go ahead and turn off the buttons showing on my chart.
Choose View, Hot Buttons, hidden.
Turning to the Order Panel below this chart, you will see a wrench icon in the upper right of the display, which you can click as a shortcut to the configuration menu for either Trade or Order Column display.
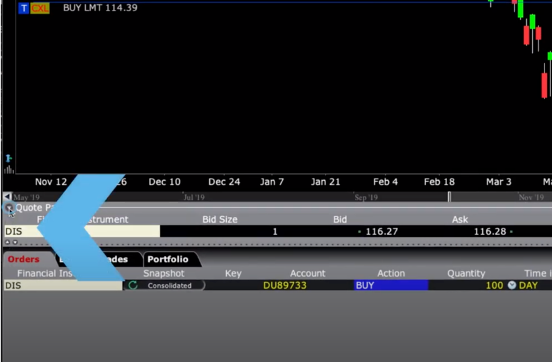
To the upper left, you can collapse and restore the Buttons or Orders Panel using the up and down arrows.
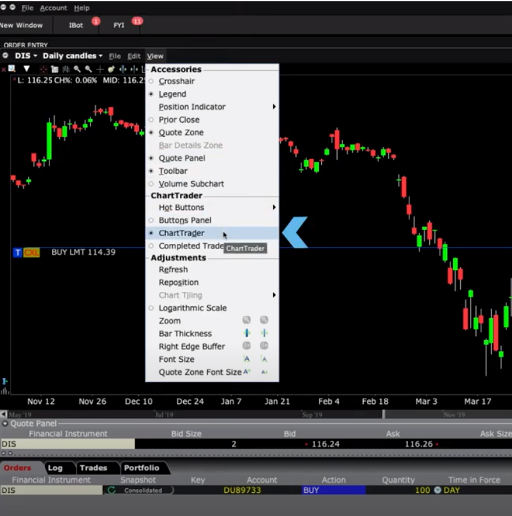
To turn off ChartTrader within a chart, access the View dropdown where you will see that the checkbox is ticked next to ChartTrader.
Deselecting will turn off ChartTrader for each chart panel. I’ll leave it checked and discuss the other menu items here.
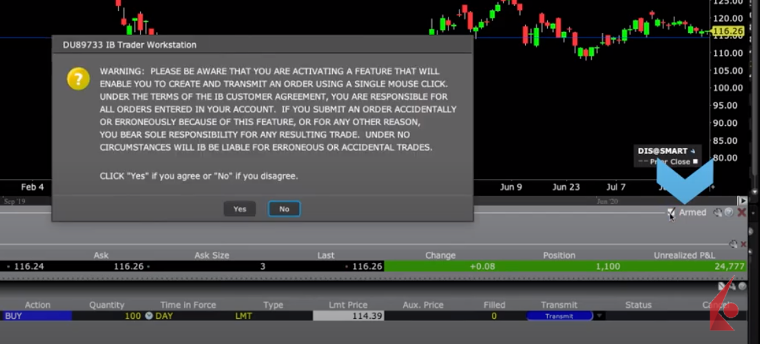
Now take a look at the Armed white checkbox in the upper right of the Buttons panel. This allows you to instantaneously create and submit orders with a single click. If I try to Arm my chart by clicking the box, you will see a warning pop-up on screen to explain the potential pitfalls of enabling this feature. To activate, you will be asked to acknowledge the warning displayed.
Creating Orders with Buy and Sell Buttons
Now that we’ve reviewed configuration settings for charts, let’s focus on creating orders.
From the Buttons Panel, clicking on the buy or sell buttons enables you to click on the chart and start an order.
You will see a dashed horizontal blue line appear in the chart – click at your desired entry point close to or away from the current trading price to create an order.
When you left click where you want the order on the chart, the blue line turns solid. Notice to the left of the line the Transmit and Cancel buttons.
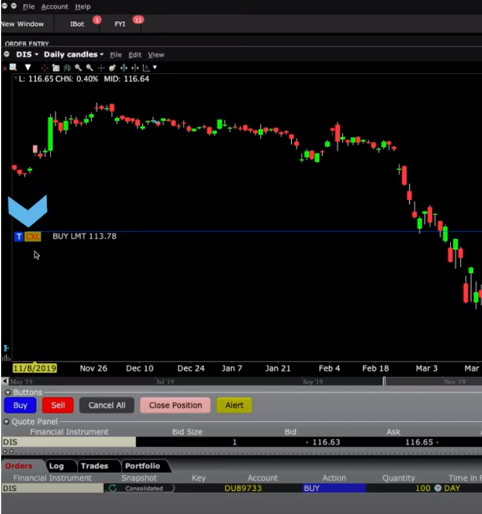
Click on Cancel to remove the order entirely from your chart.
If the order is active, you may request to cancel it.
Click Transmit on the left of the buy line or click the Transmit button to the right of the Order Panel. Either way will create an Order Confirmation.
Check the details of your order and then click Transmit.
You can also hover over the blue buy line and reposition by dragging should you wish to change your entry price.
If we follow the same process for an order to sell, we can see both buy and sell orders on the same chart.
Modify Order
There are two ways to modify an order:
- either from the Order Panel or;
- right-click on the order line.
In the Order Panel, simply change any of the inputs such as the limit price or quantity, or the order type from Limit to Market, or the time in force.
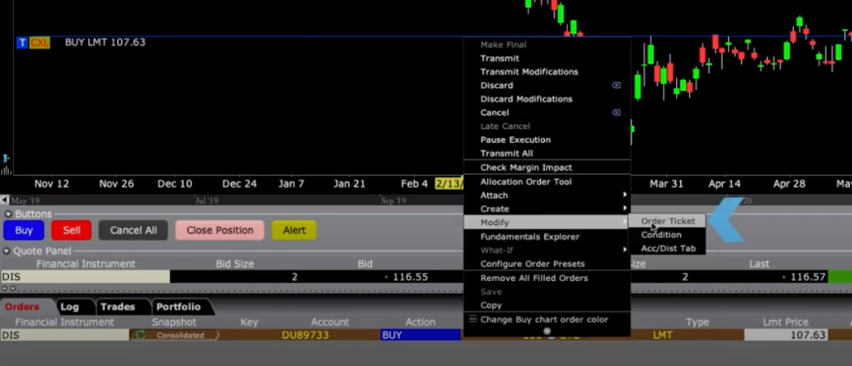
If you right-click on the order line, you’ll see your cursor turn to a double arrowhead, and you can select Modify. This will open the existing order ticket, where you can make those same changes.
Use the appropriate Preview, Accept or Transmit button to close the Order Ticket.
Attach orders
To attach an order, let’s return to the horizontal blue buy line by right-clicking and seeing the double arrowhead, where you can bring up the Attach menu.
Here you will see further elements such as Profit taking and Stop orders, or you can attach a Bracket to your order.
Let’s select to Attach a Bracket Order.

When we do, we’ll see two opposing child orders for the same amounts appear in the Order Panel and on the chart. A profit-taking sell order at an amount above the parent buy order. And a second sell stop order below the parent buy order.

You may adjust the respective limit prices in the order entry panel or reposition on the chart before transmitting the order. Only when the parent order fills do the bracket portions of the order become active.
Hot Buttons
Remember to check the availability of additional Hot Buttons in Global Configuration. Mine is currently showing two buttons that you might find useful – Cancel All and Close Position. And in an earlier lesson you learned how to configure Alerts – that button is available here, too.
For the security on display in the chart, you may have open positions in your portfolio. Click on the Portfolio tab in the Order Panel to see your exposure.
You should now have a solid understanding of enabling TWS ChartTrader, configuring its options and creating trades directly from charts. With that, let’s turn our attention to the next charting lesson in this Traders’ Academy series.






Hi! When I open a position in chart trader using attached scale target order and stop order, 2 lines appears (a red top and green bottom) and I don’t know what they are and how to take it off. The problem is that they are far out of the money and they compress a lot the candles in chart and I’m not able to manage the exit strategy on chart properly
Hello Joel, thank you for reaching out. In ChartTrader, if you access the chart settings there are different presets that will allow you to modify the chart. Please try to change the default prices for the brackets based on a percent rather than an absolute dollar value. If this does not help, please reach out to Client Services for further assistance.
Hi, when i place an order using hotkeys, chart trader automatically opens on my chart. How can i disable this? it crowds the chart, making price action difficult to read. Thanks.
Hi. I need to have 2 buy and 2 sell buttons directly in rhe chart ( buy midprice and limit and viseversa) I can only have 1 set now???
Hello Olli, thank you for reaching out. Yes, you can customize ChartTrader with specific buttons and order types in TWS Mosaic. After clicking the desired security, right-click New Chart. In the chart click View> ChartTrader. Then click “Buttons Panel”. Then you can click the wrench icon in the bottom right corner. This will then allow you to add new buttons to the Buttons Panel. You can modify the order type of the buttons.
We hope this answers your question!
Hot Buttons are not one-click since an order confirmation screen appears where you must click on transmit..unless there’s a way to pre-confirm order submission.?
Thank you for reaching out. You can disable the Order Confirmation screen by checking the option to “Don’t display this message again” at the bottom of the confirmation box. Read more about this topic:
https://www.ibkr.com/faq?id=34483582
Let us know if you have other general questions!
How to trade Extended Trading Hours with ChartTrader?
Hello, thank you for reaching out. If you configure global configuration to allow for outside RTH, you will be able to trade outside RTH on ChartTrader. In Presets for your desired product, check the box that says “allow order to be activated, triggered, or filled outside of regular trading hours (if applicable)”. We hope this helps!