The IBKR Trader Workstation offers a host of easy-to-apply watchlists, with several types of predefined, fixed-income market data from which to select.
In this lesson, you’ll learn how to:
- Apply predefined watchlists in TWS,
- Acquire insights into the data predefined watchlists offer, as well as
- Learn how to configure and customize predefined watchlists.
Applying Predefined Watchlists
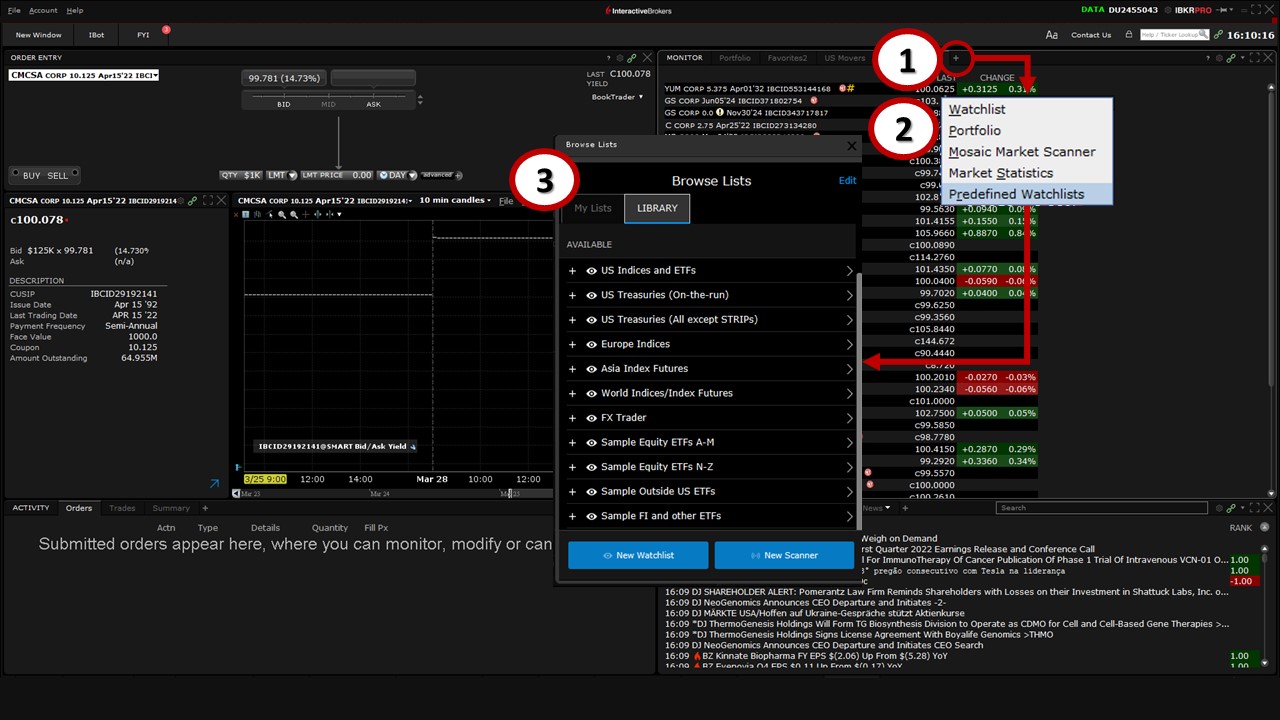
The first step in applying predefined watchlists: (1) Click on the ‘plus’ symbol in the Monitor panel, then (2) select Predefined Watchlists from the menu that appears.
You’ll then see (3) a list of available choices, including predefined watchlists for U.S. Treasuries and Corporate Bonds, which contain price and yield data.
U.S. Treasuries (On-the-run)
Even if you’re not a fixed-income trader, you may want to know how yields are performing across the U.S. government bond curve.
To do this, select the U.S. Treasuries (On-the-run) predefined watchlist to obtain a snapshot of the yield curve. Here, you’ll see the latest prices for three— and six-month bill maturities, as well as two—, five— and 10-year notes, and the 30-year Bond.
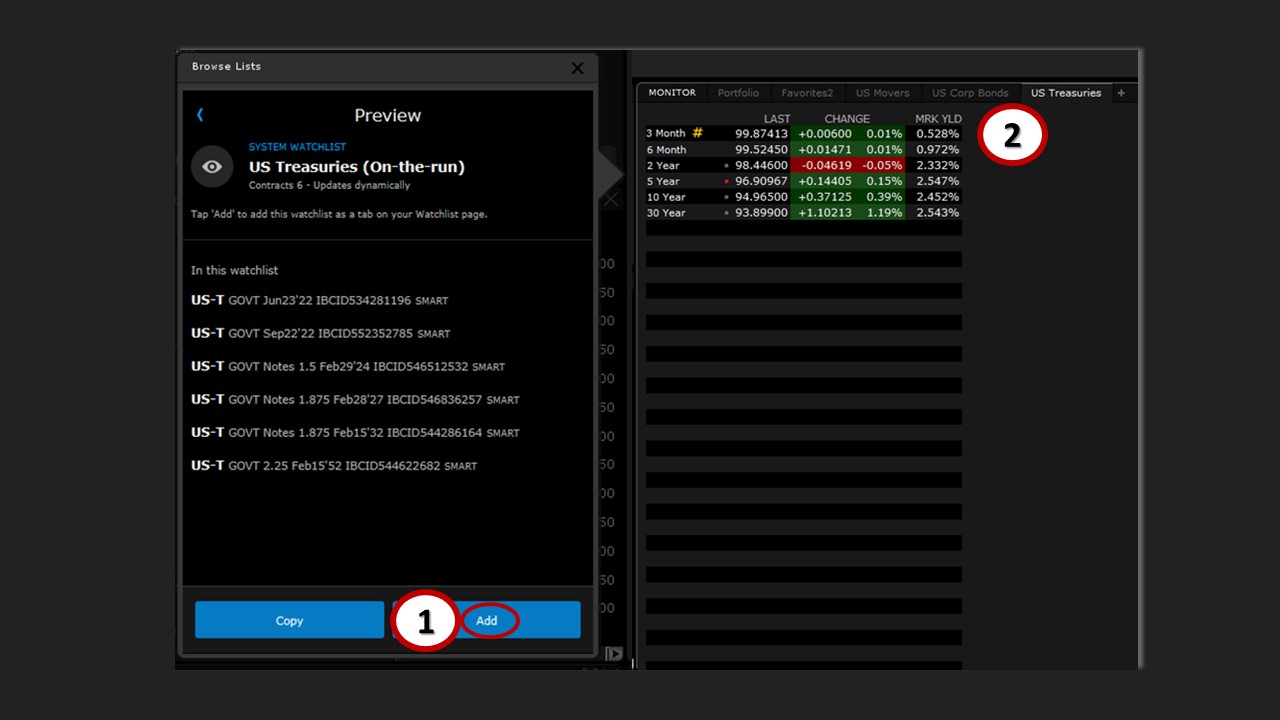
The watchlist displays change in price and percentage, as well as the corresponding mark yield.
You’ll also see two options on the watchlist – Copy and Add. While we’ll address the ‘Copy’ function later in this lesson, for now, simply (1) click Add to (2) append the watchlist as a tab to your Monitor panel.
U.S. Treasuries (All Except STRIPs)
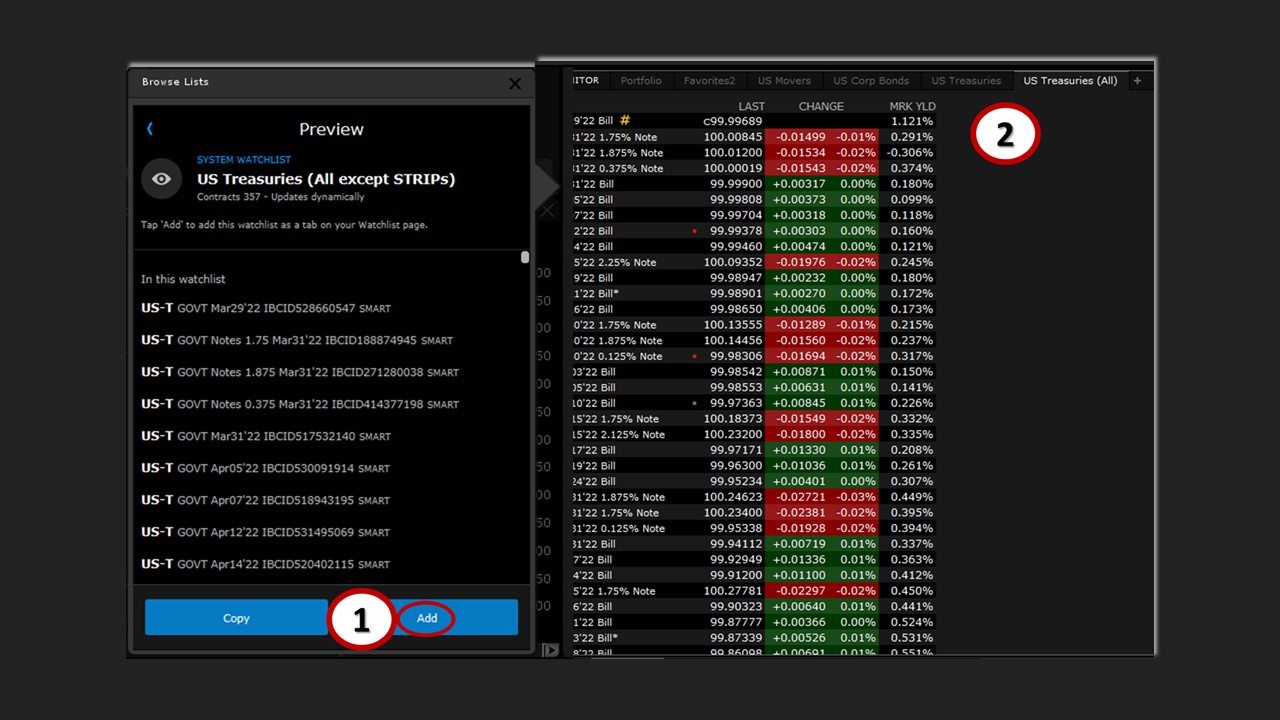
Now, repeat the above process starting from clicking on the ‘plus’ symbol in the Monitor panel. However, this time, select the predefined watchlist U.S. Treasuries (All except STRIPs) for a more complete yield curve and (1) add this as a tab to the Monitor panel. Once you do, you’ll notice (2) a far lengthier list of maturities when scrolling down through the securities.
U.S. Corporate Bonds
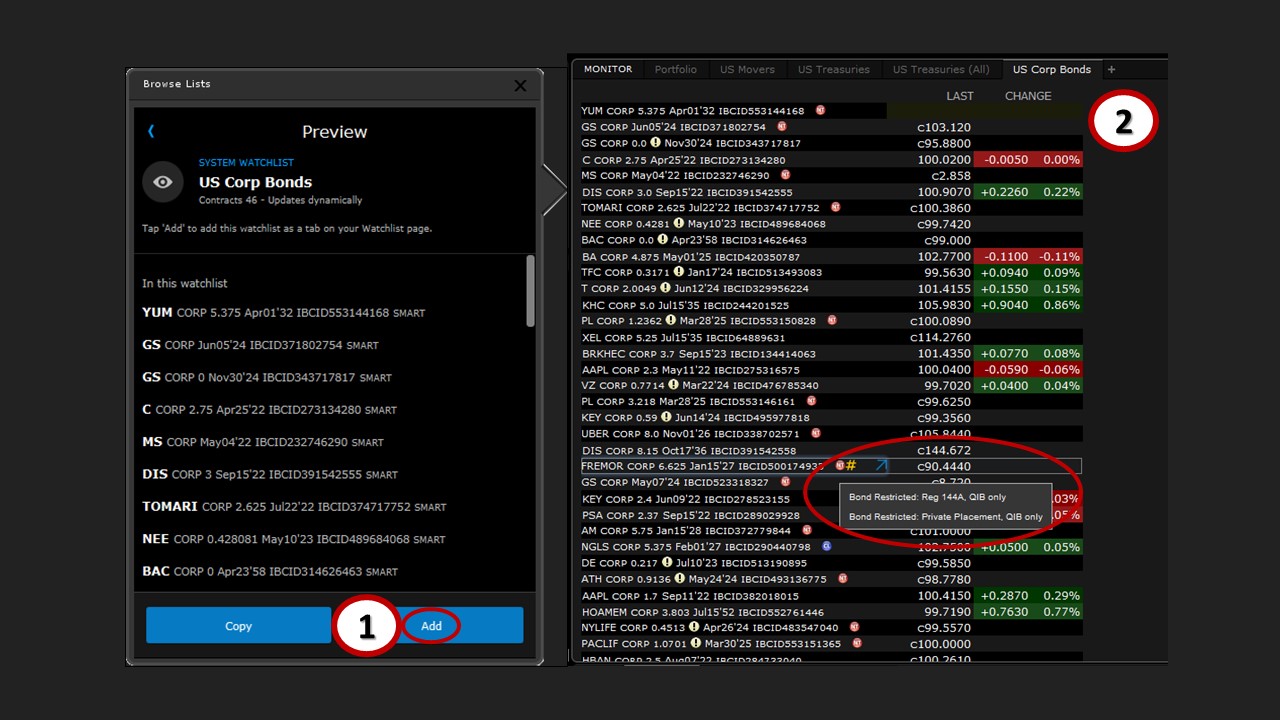
To apply the predefined watchlist for U.S. Corporate Bonds, begin the above process by clicking on the ‘plus’ symbol in the Monitor panel, selecting Predefined Watchlists from the menu that appears, and (1) adding U.S. Corporate Bonds. This predefined watchlist (2) displays the last traded price and change on the day for those U.S. corporate bonds that are most actively traded.
The Financial Instrument column provides information about the specific corporate bond by the issuing entity’s ticker, coupon, maturity date, and IBCID – IBKR’s unique identifier. Small red and blue circular badges that follow this string of information offer further details, and if you hover your cursor over any of these, you’ll see, for example, whether its purchase is restricted to only qualified institutional buyers, or if the bond has been called.
Configuring Watchlists
Although the market data for predefined watchlists are fixed, you can configure them by using the ‘Copy’ function mentioned earlier.
Follow the process from the start by clicking on the ‘plus’ symbol in the Monitor panel and selecting Predefined Watchlists from the menu that appears.
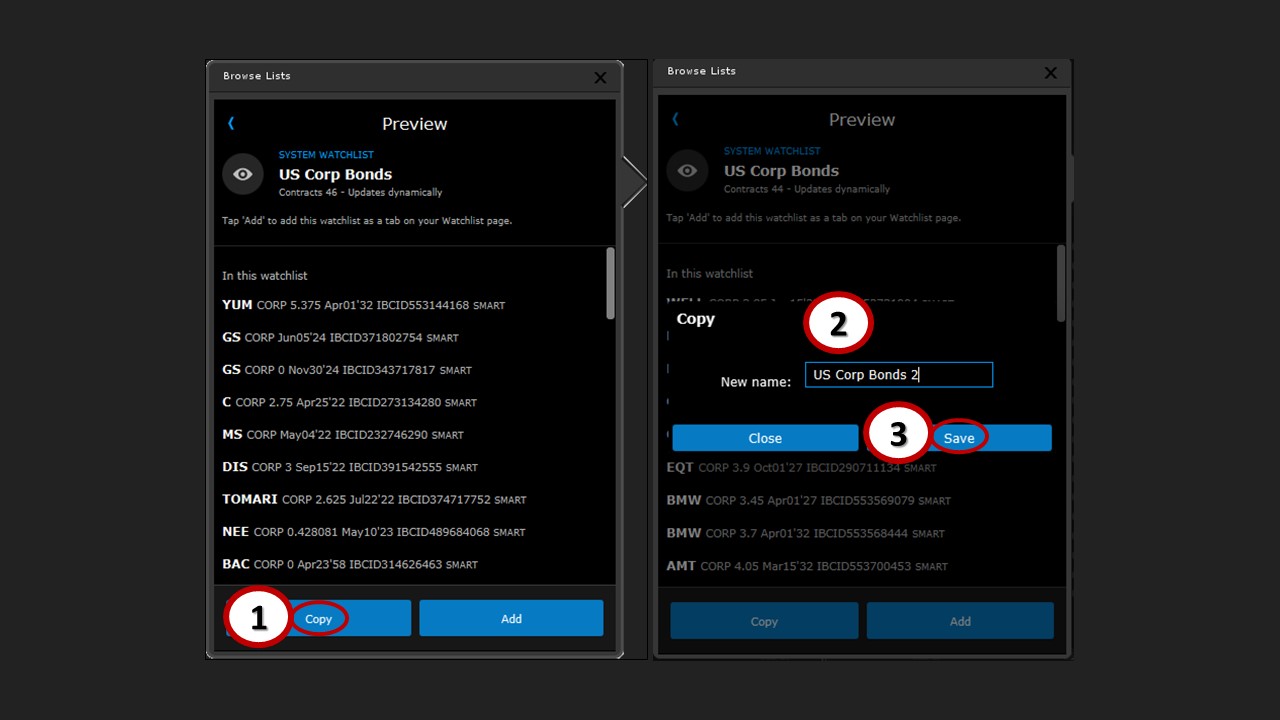
Select the predefined watchlist for U.S. Corporate Bonds again, but this time, instead of clicking ‘Add’, (1) click ‘Copy’. When you do, you’ll be prompted to (2) enter a new name – for example, you may call it ‘US Corp Bonds 2’ or another name of your choosing, and then (3) hit ‘Save’.
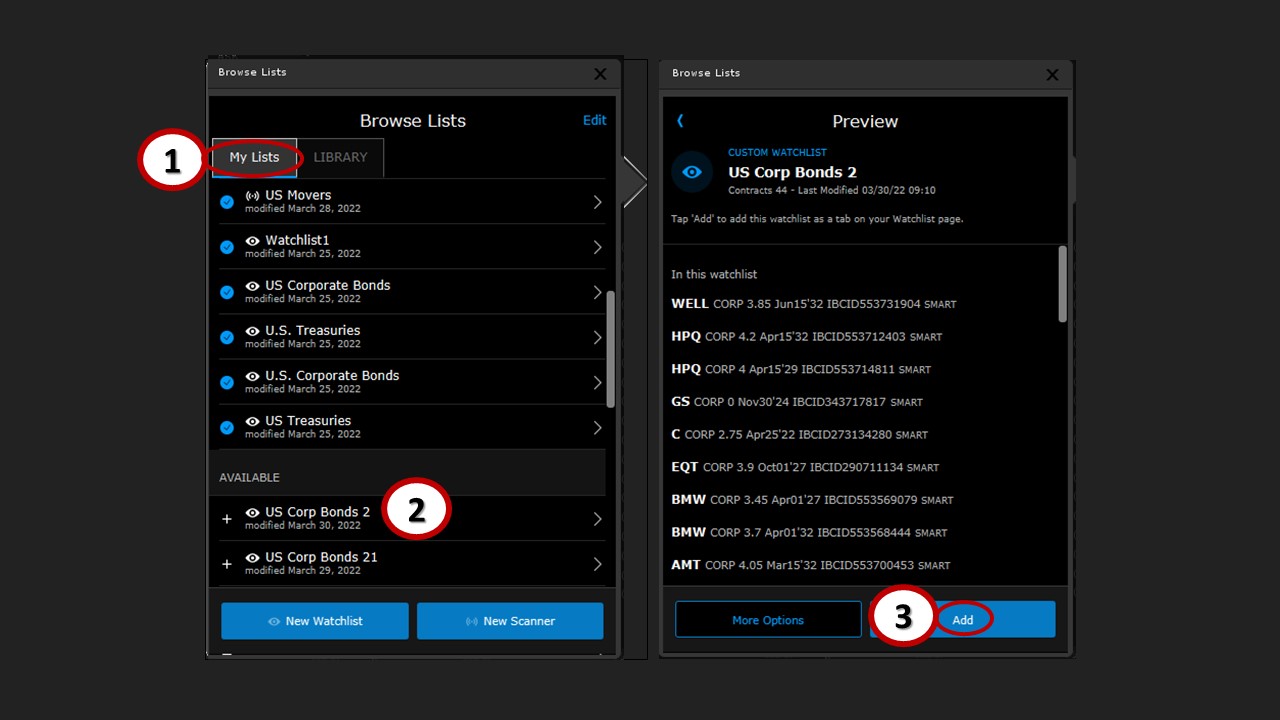
Now, (1) switch over to ‘My Lists’ in the Browser box, and you should (2) find your ‘US Corp Bonds 2’ (or otherwise named) watchlist under the ‘Available’ section. When you select it, you’ll see you can either ‘Add’ it as a tab or explore ‘More Options’. The ‘More Options’ box enables you to rename the watchlist, copy it again, or delete it. Since you’ll want to apply it, simply (3) select ‘Add’.
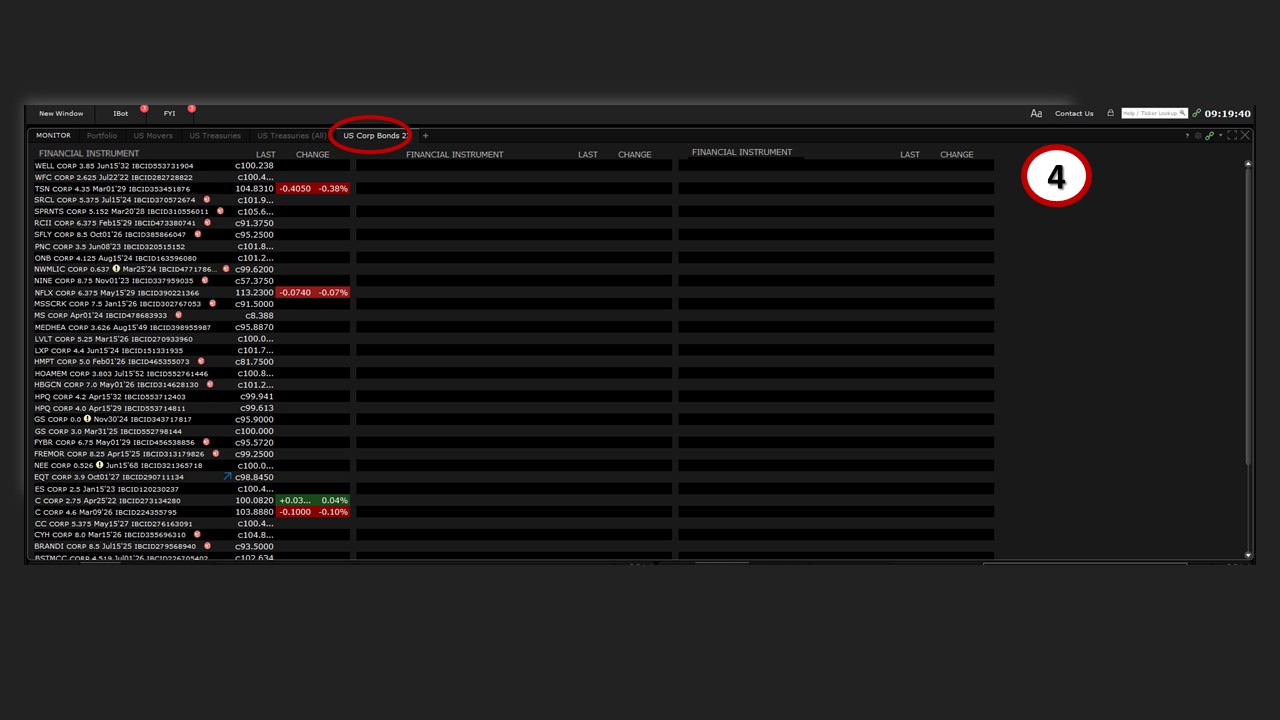
When you do, the ‘US Corp Bonds 2’ (or otherwise named) watchlist is (4) added as a tab to the Monitor panel with all the same information that was in the predefined U.S. Corporate Bonds watchlist. However, it looks a little different, and it operates a little differently, too. For instance, there are additional columns for financial instrument, as well as last traded price and change on the day, with empty cells that you can use to search for, and add, your own specific bonds.
Adding Data Fields
While we’ll show you how you can search for, and select, specific fixed-income securities in a later lesson, for now we’ll demonstrate how you can add more data fields that may further help you make trading decisions.
Since the plan is to add multiple columns, you’ll want to adjust the size of the Monitor panel to accommodate the new data.
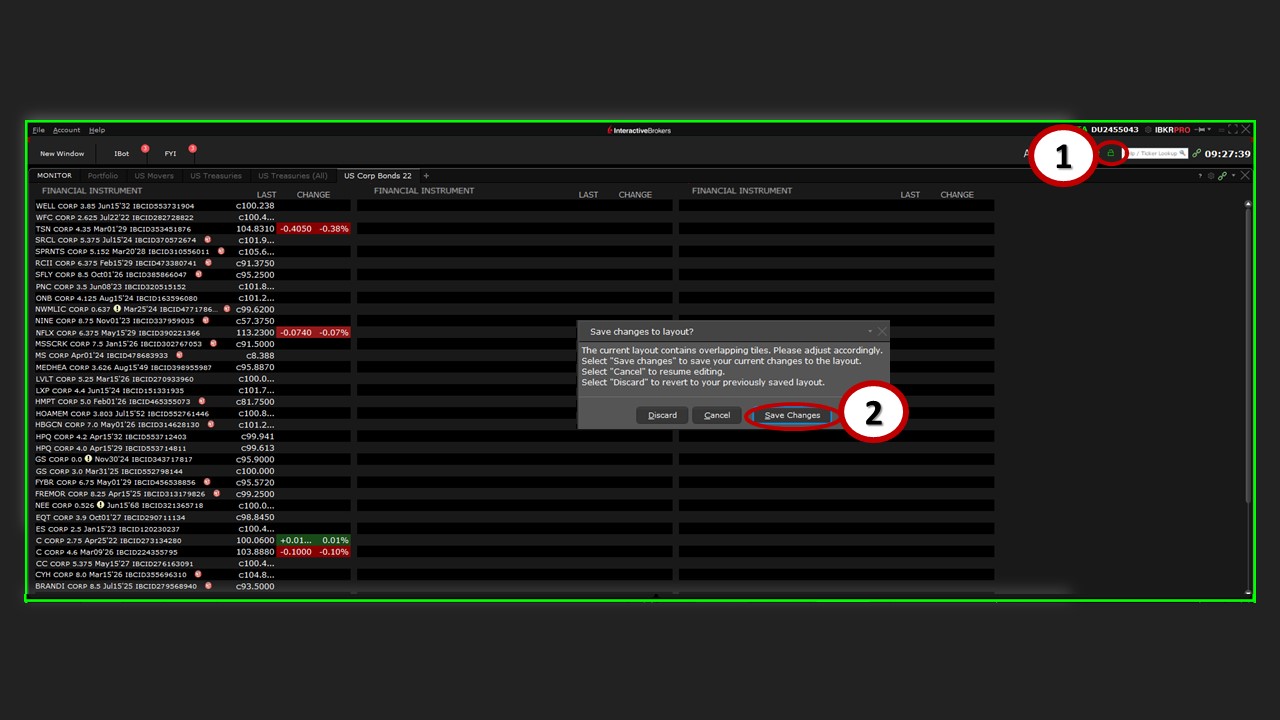
To do this, (1) click on this ‘padlock’ icon, which unlocks the Mosaic workspace. You’ll then see a green border appear, which indicates that any of the tiles in the workspace can now be added, moved, removed. or resized. Go ahead and widen the Monitor panel, then click on the padlock icon again, and (2) select ‘Save Changes’ to lock the resized panel into place.
There is now plenty of space to add columns, and there are two ways to accomplish this:
- Hover your cursor above any existing column header, and you’ll see (1) a pop-up box, where you can insert a column or remove the one you’re on. When you select ‘Insert Column’, you’ll then see (2) a floating menu, which provides a host of choices organized by category.
- For example, you’ll see a list of selections under the ‘Financial Description’ category, one of which is (3) ‘Company Name’. When you select this, a new column with company names is added to your watchlist, and the floating menu disappears.
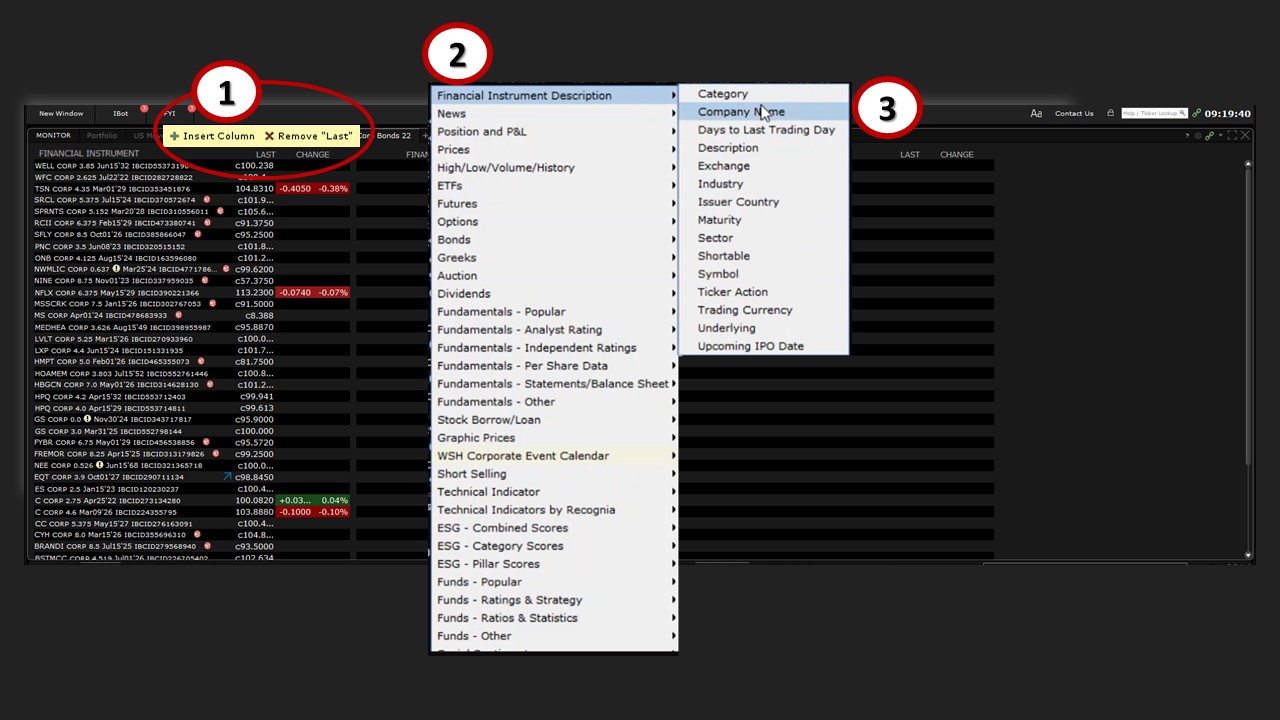
Keep in mind that you’ll need to repeat this process for each new column you’d like to add.
- Right-click on a column header and select ‘Insert Column’ from the pop-up menu. From here, the floating menu will appear, where you can find the data you’d like to add. In this menu, locate the category ‘Bonds’, and from among the many fixed-income-related choices, add ‘CUSIP’, which is a bond identifier.
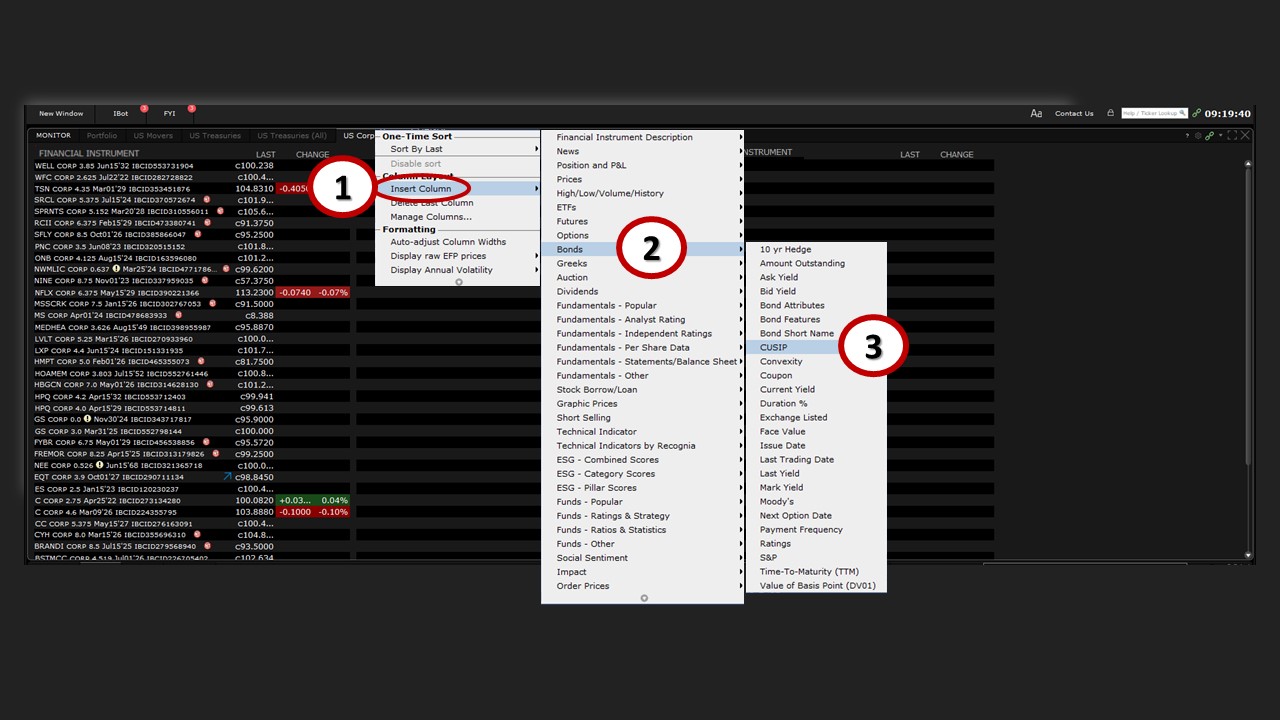
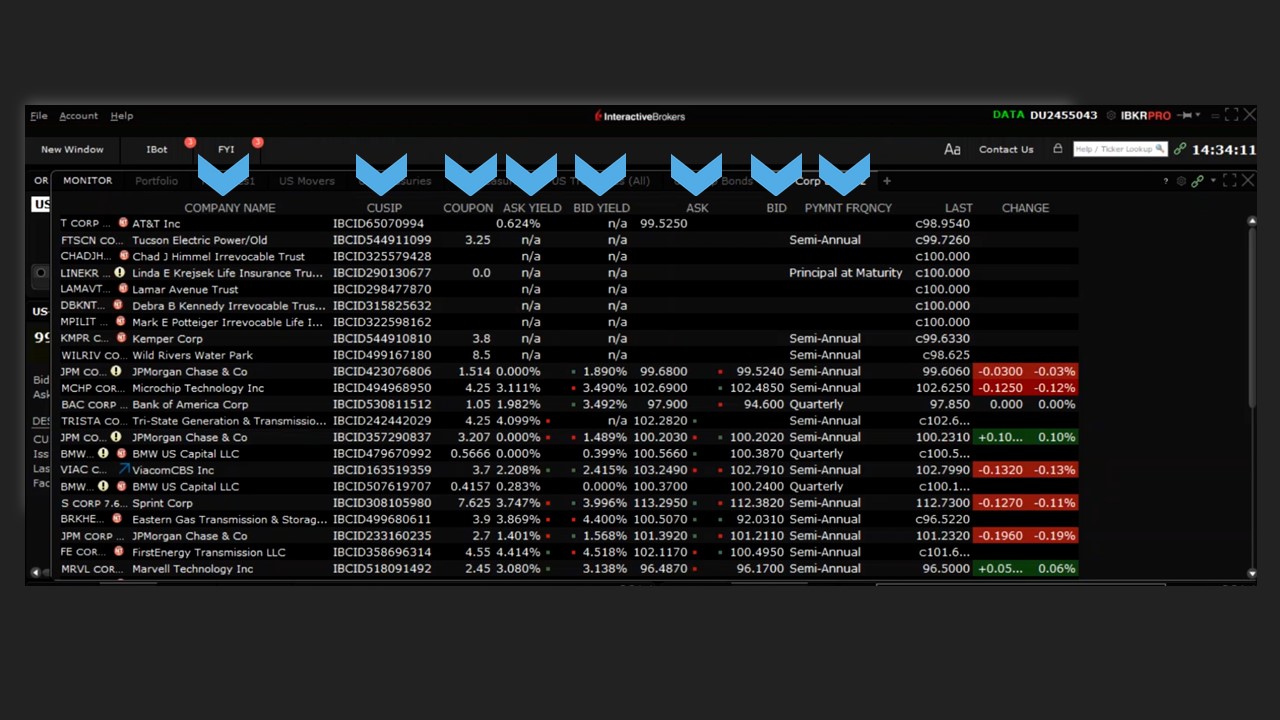
Repeat this process again for ‘Coupon’, ‘Payment Frequency’, ‘Bid Yield’ and ‘Ask Yield’. For live quotes, repeat the same process, but select the ‘Prices category’ to add market ‘Bid’ and ‘Ask’ prices.
Lastly, you can move any column to the right or left by simply clicking and holding the cursor on the column header, then by dragging and repositioning it to where you want it to place it.
Coming Up Next
Now that you’ve become familiar with how to apply and configure watchlists in TWS, we’ll next explore how to search for, and select, specific fixed-income instruments to add to them.



You didn’t tell us how to save the move from available to My Lists so it is permanent.
Hello, we appreciate your question. Please view this FAQ for instructions to save your Watchlist Layouts in TWS: https://www.ibkr.com/faq?id=28217513 We hope this helps!
What is the predefined variable for “My Portfolio”? If not predefined, hope do I create it as a “Financial Instrument” for a Benchmarks Watchlist? E.g., Watchlist including NDX, SPX, and ME
How we can use scanner on phone and add names to watchlist? I wanted to add full list of stocks from NASDAQ and NYSE in 2 different lists
Thank you for your question, Gurpreet. Please review our IBKR Mobile user guide for the following topics. We hope this helps!
1) Watchlists: https://www.ibkrguides.com/iphone/watchlist.htm?Highlight=watchlist
2) IBKR Mobile scanners: https://www.ibkrguides.com/iphone/scanners.htm
I don’t see a “Bonds” category for the fields to add. I see others — Futures, Fundamentals, Options, etc. How do I find “Bonds”? Specifically, yields.
Hello, thank you for reaching out. You can enter the symbol for the desired security into the watchlist, and be able to click Bonds. You can also enter the Corp/Muni/Treasury Bond Cusip number into the Financial Instrument column in a watchlist in TWS. Please note: to see CUSIP identifiers you need to be subscribed to the CUSIP service. https://www.ibkr.com/faq?id=56718131
Please review this FAQ for more information about how to search for bonds: https://www.ibkr.com/faq?id=35805973
We hope this helps!