There are several ways for an Advisor to enter an order from the Mosaic interface. Trades can be entered for an individual account, a group of accounts or for all accounts at the same time. We have another video to explain how Groups may be created within the Advisor Setup area.
Trades can be entered according to one of several methods, such as how much available equity is in a client’s account, or what the net liquidation value is, or simply by using an equal quantity to accounts included in the order. We will walk through such pre-trade allocation in this video.
In a later video, we will also show you how greater precision can be used for orders using the Allocation Order Tool. This tool can be used to solve problems such as listing the number of shares each account should buy or sell, defining a dollar amount to be invested or dealing with partial fills from a prior trading session and matching them to your next order.
And we’ll also show you how to create and invest in model Portfolios as well as getting investments back to an intended level of weighting by using the Rebalance Tool.
Let’s take a closer look at the Order Entry Panel in Mosaic.
- With a ticker symbol loaded, click the appropriate Buy or Sell button.
- Enter the number of shares you wish to transact.
- Set your time in force and limit price where necessary form the adjoining dropdown menus.
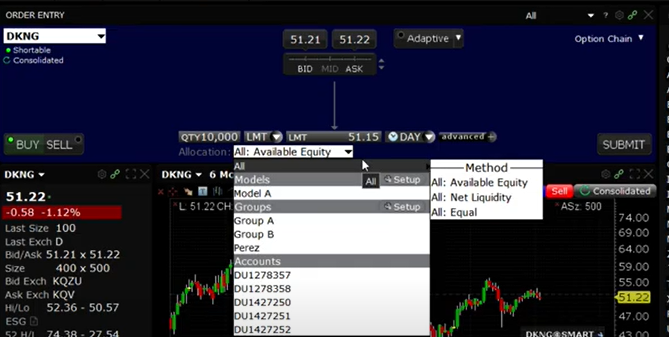
- Now, here’s the crucial point when determining who you are transacting for: Use the Allocation dropdown menu to pick the account or group of accounts you wish to transact for. In this case, you can see that my default allocation is set to All accounts using one of three methods.
- These are Available Equity, Net Liquidation Value and Equal Quantity.
- The default preset may be configured from the Advisor Setup tool, but whenever I trade, unless I make a change from this dropdown menu, I will be allocating to ALL clients according to available equity.
- Use the expansion menu to the right of ALL to change the selection Method.

Glance down the allocation dropdown menu to see that you may select from customized groups, again, configured using the Advisor Setup tool, or you can select that single account.
Once you have made your selection the dropdown menu will close and you may now click the Submit button to continue with your order.
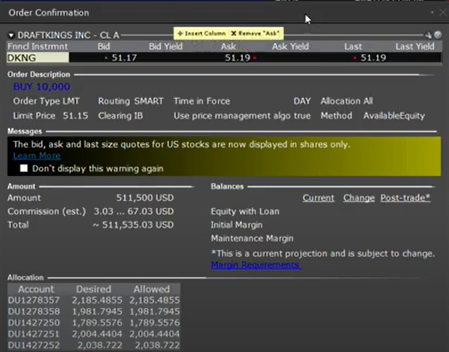
That action will generate an Order Confirmation, which clearly states how the order will execute.
For an individual account you will see a matrix displaying the current position in the chosen symbol, the initial and maintenance margin at work for this account, how it would change should the trade execute and what those variables would look like post-trade.
To the lower right of the Order Confirmation ticket, you will see the allocation broken out by account, what the desired number of shares is for that allocation selection and what is allowed subject to either Available Equity or Net Liquidation Value.
Rules for how orders are handled in the event that insufficient funds are available in a specific account are configurable in the Advisor Setup.

Once content with your order, click Transmit. The order will be routed accordingly, and the open order will display in the Activity panel to the lower left of the screen. Notice in the Allocation column of the Live orders tab, you can easily see whether the order is for one or ALL accounts, or a group of accounts. Note that from here, orders may be modified and resubmitted should any changes be made to time-in-force, order type or price.


Join The Conversation
For specific platform feedback and suggestions, please submit it directly to our team using these instructions.
If you have an account-specific question or concern, please reach out to Client Services.
We encourage you to look through our FAQs before posting. Your question may already be covered!