While the primary purpose of the Order Entry window is to allow you to create and submit orders, it also has additional capabilities, such as:
- How to create and submit basic orders
- Create attached orders
- How to execute alternative trading methods
After opening TWS, you’ll see the Order Entry panel’s default view in Mosaic, which is typically a user-friendly environment for most transactions.

Selecting a ticker symbol for an Order
There are several ways to input a stock ticker for this trade:
- You can click on a symbol in the Monitor panel, or type one in.
- If you’re typing one into the Monitor panel, select stock followed by SMART, which is IBKR’s default SmartRouting order methodology.
- On the Order Entry panel, you can also enter the symbol directly into the input field, or you can select one from the dropdown menu, which retains a history of previously used symbols.
Creating an Order
The National Best Bid and Offer, or NBBO, is displayed for the selected symbol in the middle of the window.

At the bottom left, click on either the Buy or Sell button. Do you notice how the background color adjusts according to your selection?
Now click on the Quantity wheel and either scroll the mouse to select the desired number of shares to transact, or just type the number directly into the input field.
When you select your order type, you’ll see that Limit order – designated as “LMT” — is prepopulated as the default type, but this can be easily changed to another of the many available selections using the dropdown menu, including IBKR’s array of Algos. Click the arrow at the bottom of the menu to see more choices.
For this example, let’s stick with the Limit order, and let’s modify the limit order price by either:
- Clicking the price input field.
- Selecting from the wheel; or
- Typing into the input field.
You can also use the Price Slider directly beneath the Bid/Ask spread to locate incremental prices on either side of the quote.
With the Limit Price selected, now select Time-in-Force for your order. Do you want it to be active for the day or would you prefer to decide when to cancel it? Here, I’ll select DAY from the dropdown menu.
The trade is now a DAY order, and it’s ready to Submit! This is easily done – just click the Submit button here. When you do that, it will generate an Order Confirmation, which you should review before pressing Transmit at the bottom of this pop-up.
The Order Confirmation will provide you with details of your trade, the amount and commission, as well as the expected impact on margin should the trade execute.
When you click the Transmit button, the order will appear in the Orders tab of the Activity panel.
Saving Orders for Later
You can create orders this way and save them so that they appear in the Activity panel, where you can submit them at a later time.
To do this, create an order just as we did – but with an additional step. Here are the steps:
- Select whether to Buy or Sell a stock;
- Enter the quantity you want to Buy or Sell;
- Select the limit order price for the trade; and
- Choose its Time-in-Force.
The additional step here is to select the Advanced plus sign, and when you do, you will see additional order parameters and three buttons– Check Margin, Save and Submit.
The Check Margin button will open an order confirmation window as we showed earlier.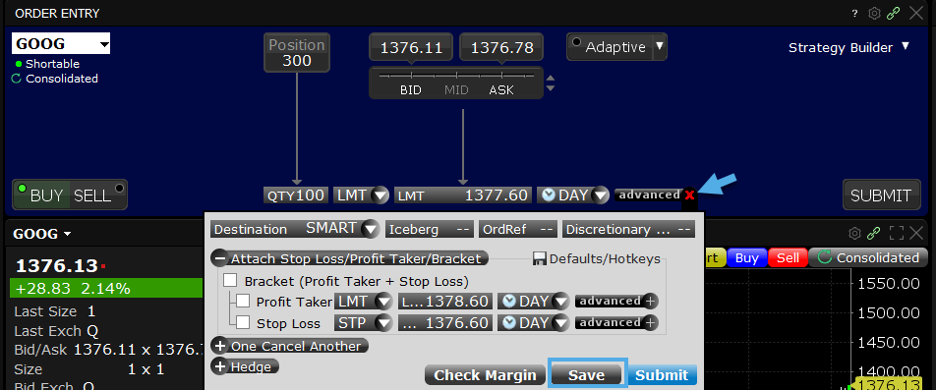
Clicking on Save will bypass that step and send the inactive order straight to the Activity panel. Now you’ll see the order displayed = simply click Submit when ready.
This will then create an order confirmation window to appear. Click Transmit when ready.
Quick Access to additional Tools
Sophisticated orders can also be created with just a little configuration.
Some other features to consider – to the right of the Order Entry panel is a dropdown menu.

Here you will see several shortcuts to additional tools, each of which relates to whichever ticker symbol you have currently loaded into the panel.
For example, while looking at the underlying stock symbol, you may want to view:
- company fundamentals,
- see current options quotes,
- market depth or build a multiple legged strategy.
Note that Traders’ Academy offers further insights into all these subjects – and we urge you to explore all of our courses at your own pace.
Advanced Panel
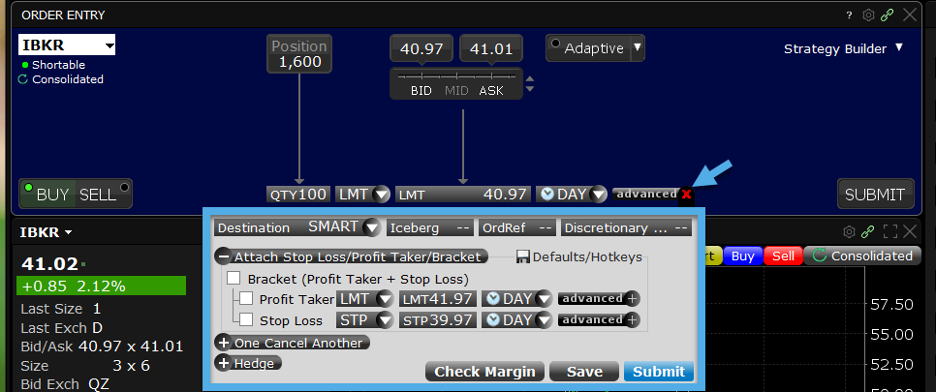
In the meantime, let’s return to the Advanced plus sign, where when expanded, you’ll see a host of other options.
Attaching Orders
By using the Destination dropdown menu, for instance, you will see the destination default as SMART. You can also direct your order to a specific exchange, perhaps for liquidity or rebate reasons.
In the Advanced section, you can also attach a Profit taker or a Stop Loss to an order – or both to create a Bracket Order.
Just check the desired boxes and enter limit and stop prices.
If it’s necessary, you can change the Time-in-Force.
When each input is added, click Submit to enter the order. Once again, you can use the Save button to add it to the Activity panel should you wish to return to the order later.
One Cancels Another
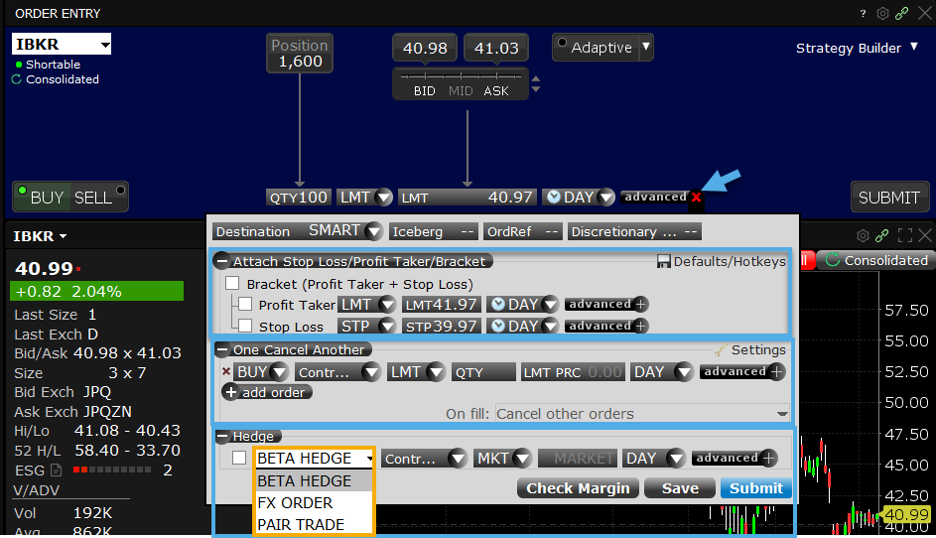
Other features in the Advanced window includes the One Cancels Other function, which will enable you to create a contingency on secondary trades.
For example, an investor may want to enter a limit order to buy 500 shares in one company OR 750 shares in another but NOT both.
The Settings wrench will provide you with additional controls over each piece of your order, including reducing or cancelling partial fills.
Hedge Function
The Hedge function enables you to select from a trio of strategies, including Beta hedge, which allows you to reduce risk by selling an ETF against a stock. Here, the system will automatically calculate the number of shares to sell using historic Beta values.
With FX hedge, you can enter an order to buy or sell a stock denominated in a currency different from its base account and attach an order to transact the required amount of settlement currency.
Also, the Pair trades strategy allows you to take positions in two stocks simultaneously, buying one and selling the other.
Notice that as any selection is checked, the augmented order type is displayed prominently next to Order Entry.
Shortable Indicator
Now, let’s turn your attention to the Shortable indicator, located Immediately beneath the symbol input field.

For most stocks, this indicator will be green — this tells you that IBKR has plenty of available stock to lend to short sellers. However, for harder-to-borrow names, the color will become less green, indicating that IBKR availability is limited, and may even become red — signaling that availability of the stock is very low or there is zero inventory.
Adaptive Algo
You’ll see an Adaptive toggle next to the Bid and Ask prices.

Adaptive can be used with a limit or market order and is designed to achieve better than average cost efficiency over basic limit and market orders by attempting to trade market and aggressive limit orders between the spread.
You can specify how urgently you want the order to fill using the “priority/urgency” settings in the Advanced section. More information about the Adaptive Algo is available in the Traders’ Academy TWS Algos course.
Customize the Order Entry Panel
Lastly, you can also customize the Mosaic order panel!
This is useful if you want to enter trades rapidly, using fewer keystrokes, here is how the panel can be customized for that purpose:
- First, click on this gear icon and select Settings to reveal three different Order Entry panel styles.
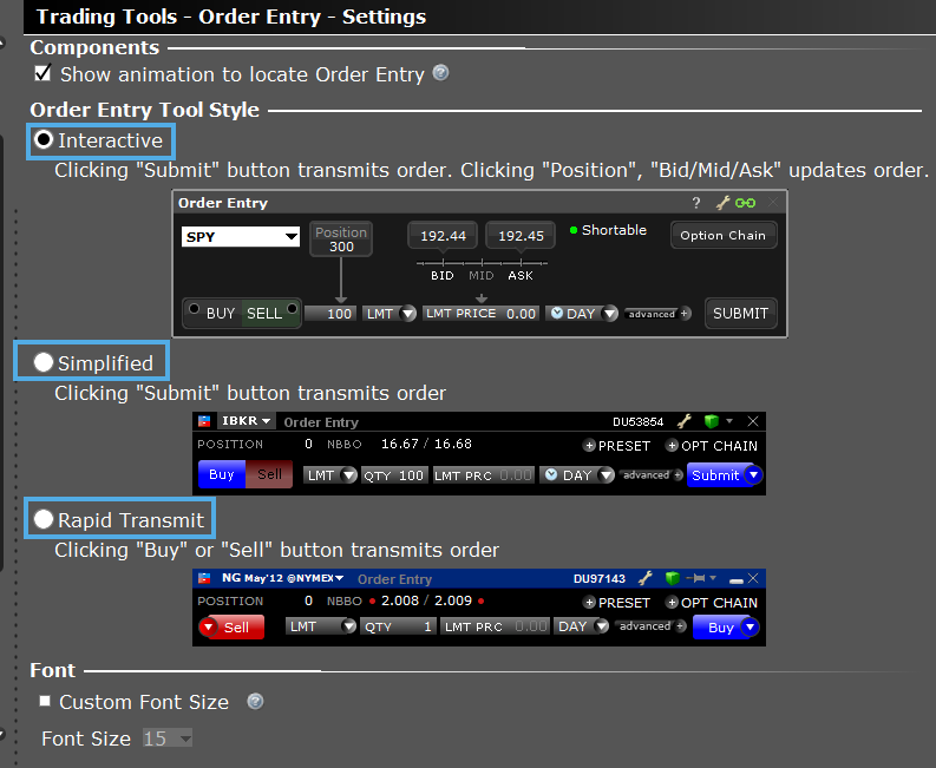
- The Interactive style displays the clickable Position and Bid/Mid/Ask ruler, which you can use to fill in order parameters.
- The Simplified style uses a smaller display with fewer selections; and
- The Rapid Transmit style lets you quickly submit an order by clicking the Sell or Buy button. You’ll notice that this style does not include a Submit button.
- In this lesson, we’ve used the Interactive style.
Traders’ Academy – Related Courses
Watch: Intro to Order Types and Charts TA courses
You’ve now completed Traders’ Academy TWS for Beginners Lesson 2.
By now you should feel comfortable with:
- Basic order entry in Mosaic
- The importance of that Advanced expand button to help you with more technical order types.
Look out for more lessons from this course by selecting the Education menu on the IBKR home page and choosing Traders’ Academy, or for additional related material, refer to the Introduction to Order Types and Introduction to Stocks courses from Traders’ Academy.










how to enter conditional order
Hello, thank you for reaching out. Please view this FAQ for instructions to create a Conditional Order in TWS: https://www.ibkr.com/faq?id=28224878
We hope this helps!
Hello, could you please explain how to properly enter a TP/SL exit strategy order?
For instance, I had an existing position 1 x Long Bull Call Spread @ $3
It is now trading for $6
I selected it, and clicked the “SELL” on the order entry panel.
I then opened the “Advanced” drop down menu drawer and clicked the “One Cancel Another” button
I created two sell orders beneath: Sell Limit @ 10 (TP) and another Sell Stop Limit @ 5.25/5.00 (SL)
When I hit submit, the option combo immediately sold at current market price.
What did I do wrong and how could I have achieved what I intended to do instead?
Thank you for reaching out. Please review this IBKR Campus lesson: https://www.interactivebrokers.com/en/trading/orders/bracket.php
It may be of some interest to you!
Is there any way to default to stock when entering a symbol rather having to type a symbol and then click stock?
Thank you for asking. Please view this FAQ for instructions to stop TWS showing all assets when you enter a ticker: https://www.interactivebrokers.com/faq?id=54145098