- Solve real problems with our hands-on interface
- Progress from basic puts and calls to advanced strategies
Interactive Options Course

Posted February 7, 2023 at 3:19 pm
See Part I for an overview of Jupyter Notebook.
I assume that you are following the chronological order of this article. If so, then you have learned what Jupyter notebooks are, how to install it, and how to run and open it. If not, then I would recommend you to go through them to get an overall picture. Nevertheless, if you are already familiar with those parts, go on and keep learning.
In this section, I will explain the various components of Jupyter software. When you start Jupyter Notebook application, and you’ll be presented with the homepage. Let’s start exploring it. Below shown is the snapshot of the homepage that you’d seen earlier, but with numbers assigned to each component to make our learning easier.
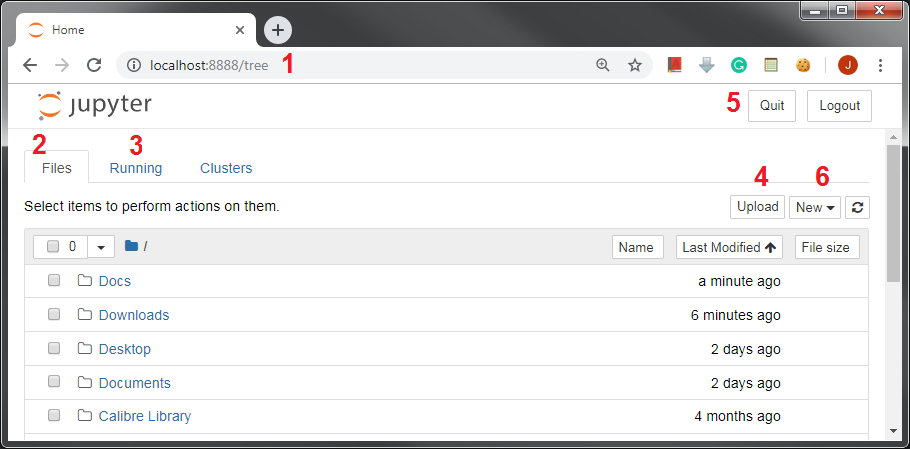
Here’s the description of each numbered point shown in the snapshot.
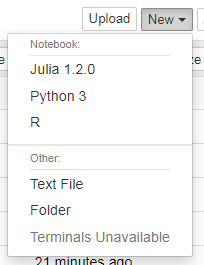
You can create a new notebook by clicking on the respective language name. Regardless of what language you choose, the new notebook that you create will have the same appearance. The difference would be in terms of the kernel attached to it. If I click on Python 3 on the dropdown opened, a new notebook with Python kernel attached to it will be created. The empty Jupyter notebook is shown in the snapshot below. (Obviously without numbers :p)

The newly created notebook has various components which are explained below:
Any text or code that you write goes in the cell. Cells are the building block of any Jupyter notebook. Cells operate in two modes: command and edit mode, and they are of mainly three types: code, markdown, and Raw NBConvert.
The command mode allows you to manipulate cells. That is, the action you perform has to do with the cell as a whole. The command mode is represented by a grey border around the cell with a blue indication, as shown in the below snapshot.

Some of the operations (along with their shortcuts) that you can perform when a cell is in the command mode are as follows:
A to insert a new cell above, and B to insert a new cell below the current cell.Shift-M allows to merge selected cells or to merge the current cell with the cell below the current cell.C copies selected cells.X cuts selected cells.Shift-V to paste cells.D, D deletes the current cell. Be careful with this shortcut.Y changes the cell type to code, M changes the cell type to markdown, and R changes the cell type to raw.1, 2, 3, 4, 5, and 6 are used to change the cell type to the respective heading size.F opens find and replace dialogue box.Shift-S to save the notebook.L toggles line number in the current cell.O allows you to toggle the output of the current cell.I, I interrupts the kernel. That is, if any process is being executed by the kernel gets stopped.Space scrolls the notebook down, Shift-Space scrolls the notebook up.return key changes the mode of a cell to the edit mode.The shortcuts mentioned above work only in the command mode cells. Another mode that a Jupyter notebook cell supports is the edit mode. This mode specifically allows you to edit the content of a cell and work with it. You can enter into the edit mode of a cell by pressing the return key or by a mouse click inside a cell. The border around cell changes to Green when the cell is in the edit mode, as shown in the below snapshot.

Once the cell is in edit mode, you can start writing code or text. The below-mentioned are some of the operations that you can perform while the cell is in the edit mode.
Tab key to use this facility. It works only for code type cells. In markdown cells, it will simply put tab spaces.Ctrl-] to indent the code in code type cells. In markdown cells, it will insert spaces according to the specifications of the tab key.Ctrl-[ to do so. In markdown cells, this shortcut works similar to Shift-Tab and dedents the content.Ctrl-/ to comment a code. In markdown cells, this shortcut does not have any effect.Shift-Enter to perform this action.Ctrl-Enter to run selected cells or the current cell.Alt-Enter to execute the current cell and insert the new cell below the current cell.Ctrl-Shift-Minus to split the current cell into two separate cells at the cursor.Ctrl-M or press Esc key to exit from the edit mode and enter into the command mode.By now, you have already encountered code and markdown cell types quite a few times. In case you are not aware of the two, now is the time where I will explain them in detail. I will restrict the discussion for these two types only; I won’t be covering the Raw NBConvert type in this article.
Jupyter notebook cells can be multiple types. Often used types are code and markdown. The code type cells allow you to write live programming code. That is, you can perform any sort of programming in them. Once you run or execute a code cell, Jupyter notebook will present the output just below the cell. This is shown in the below snapshot.

In contrast, whatever written in the markdown cell, will get printed in the cell itself, as shown below:

There are two cells in the above snapshot. The first cell numbered four, is the code cell, which allows tying in Python code as we are working with Python kernel notebook. The next cell is the markdown cell where the normal text is written.
As can be seen, code cells have a number associated with them, whereas markdown cells do not have any numbering. Numbering code cells helps in two ways: First, it shows the sequence in which code executed, and second, it allows us to differentiate between the code cells and markdown cells visually. Now that you know the basics of cells and their workings, let’s see how you can use markdown.
Stay tuned for the next installment to learn how to write down in Markdown in Jupyter Notebook.
Originally posted on QuantInsti Blog: https://blog.quantinsti.com/jupyter-notebook-tutorial-installation-components-magic-commands/.
Information posted on IBKR Campus that is provided by third-parties does NOT constitute a recommendation that you should contract for the services of that third party. Third-party participants who contribute to IBKR Campus are independent of Interactive Brokers and Interactive Brokers does not make any representations or warranties concerning the services offered, their past or future performance, or the accuracy of the information provided by the third party. Past performance is no guarantee of future results.
This material is from QuantInsti and is being posted with its permission. The views expressed in this material are solely those of the author and/or QuantInsti and Interactive Brokers is not endorsing or recommending any investment or trading discussed in the material. This material is not and should not be construed as an offer to buy or sell any security. It should not be construed as research or investment advice or a recommendation to buy, sell or hold any security or commodity. This material does not and is not intended to take into account the particular financial conditions, investment objectives or requirements of individual customers. Before acting on this material, you should consider whether it is suitable for your particular circumstances and, as necessary, seek professional advice.


Join The Conversation
For specific platform feedback and suggestions, please submit it directly to our team using these instructions.
If you have an account-specific question or concern, please reach out to Client Services.
We encourage you to look through our FAQs before posting. Your question may already be covered!