- Solve real problems with our hands-on interface
- Progress from basic puts and calls to advanced strategies
Interactive Options Course
Posted July 15, 2025 at 2:36 pm

The author of this article is not affiliated with Interactive Brokers. The software is in no way affiliated, endorsed, or approved by Interactive Brokers or any of its affiliates. It comes with absolutely no warranty and should not be used in actual trading unless the user can read and understand the source. The IBKR API team does not support this software.
ShinyBroker represents the independent scholarship of the authors/creators and is not sponsored by or attributed to Duke University. ANY USE OF SHINYBROKER IS AT THE USER’S SOLE RISK. In no event shall Duke University be liable to you, the user, or any other individual or entity, whether such liability is based on contract, negligence, strict liability in tort, warranty, or any other legal or equitable theory, for relieve arising out of or relating the use of ShinyBroker. Further, in no event shall Duke University be responsible or liable for any direct, indirect, special, incidental, or consequential damages or lost profits or other economic loss or damage with respect to ShinyBroker to you, the user, or any other individual or entity regardless of legal or equitable theory. Further, for more information, review the LICENSE agreement included with the package and posted online at https://shinybroker.com/LICENSE.html. Feature requests and bug reports are welcome on our GitHub Issues Page as we continue build up a full-featured platform for use in and outside the classroom.
This ‘hello world’ walkthrough shows you how to set up a good development environment, install the ShinyBroker package, connect it to a running instance of TraderWorkstation (TWS) or IB Gateway (IBG), explore a few of the default market data features, and use Shiny to create a functioning user interface. The next article in this series will explain how to fetch, process, and graphically display market data from IBKR.
The ShinyBroker package, and the examples in the documentation, were created with PyCharm. You certainly do not have to use PyCharm, but it is used in this article series to make the material accessible to readers who aren’t old hands at dealing with environments, versions, and packages. If you follow this tutorial and use PyCharm, you will not have to worry about any of that; if you don’t, then it’s assumed you know what you’re doing and are comfortable with your own setup.
Use TWS unless you’re already comfortable with IBG. ShinyBroker will work fine with IB Gateway, but it’s recommended to start out with TraderWorkstation so that you can use its UI and menus to verify/follow along with whatever you’re building in ShinyBroker.
Install the following:
Create a new PyCharm Project: We’re going to set up a PyCharm project for this tutorial and instruct it to use one and only one dedicated installation of Python. This way, you don’t have to deal with all sorts of compatibility problems that may otherwise arise between different Python versions, libraries, and so on.
Word of Advice: If you’ve followed these steps and are having trouble — especially if you’ve just installed everything and set up your project all in one go — then you might want to reboot your computer, or at least try exiting and restarting PyCharm.
Once your development environment is set up, either by completing Step 0 or your own project setup, you may proceed.
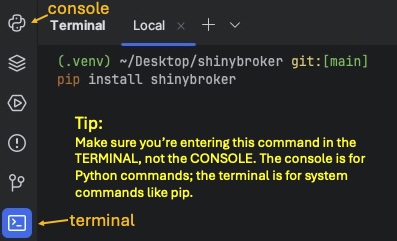
Run the command pip install shinybroker in your project’s terminal.
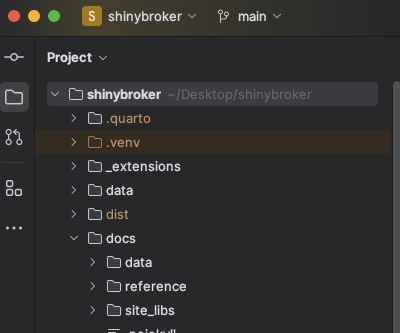
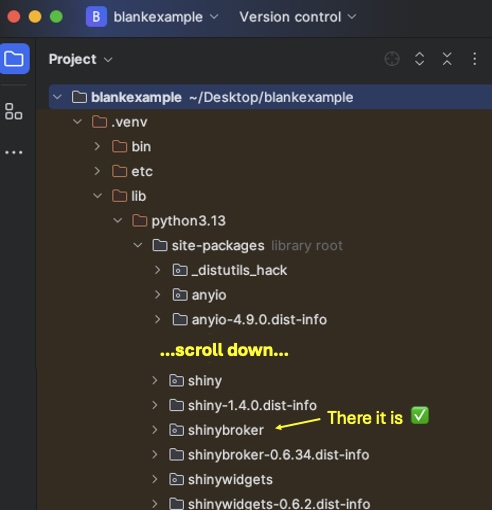
You’ll know it installed correctly and in the right place because you’ll be able to find it in your .venv folder:
Now that ShinyBroker is installed, it’s time to make sure your TWS is set up to accept data connections from APIs.
You need to check a few settings in TWS to make sure it will permit a data connection with ShinyBroker.
1. Launch TWS and sign in to your paper account (or use the demo)
2. Open the API Configuration menu found at File > Global Configuration > API > Settings.
3. Check Enable ActiveX and Socket Clients
4. Un-check Read-only API to allow ShinyBroker to send orders to TWS. We won’t be using this in the current tutorial but subsequent articles will need it. Your settings menu should now look like the below:
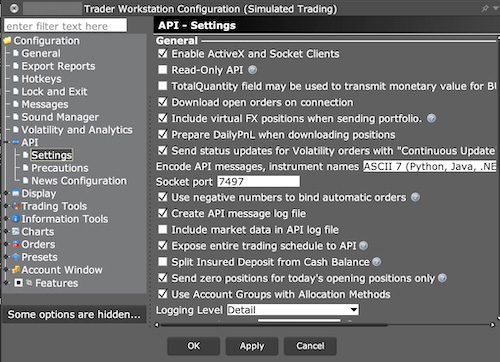
5. Click “Apply” and “OK”
6. Don’t close TWS. You’ll need it open and running or else ShinyBroker won’t have an IBKR connection to connect to!
Next we’ll run a bare-bones ShinyBroker app to check that it runs and can connect with TWS. Reminder that TWS needs to be running in order for ShinyBroker to work, so if you shut it down after the previous step, you’ll need to launch it again before going on to the next.
1. Create a new Python script in PyCharm with File > New, then select “Python File” and give it an informative name (the example uses “hello_world_1.py”).
2. Paste the code below into your script:
import shinybroker as sb
# Create an instance of a ShinyBroker App object using the default ui and server
app = sb.sb_app(
host='127.0.0.1', # localhost TWS is being served on your local machine
port=7497, # make this match the port in your API Settings config
client_id=10742 # picked at random, choose another Client ID if preferred
)
# Run the app
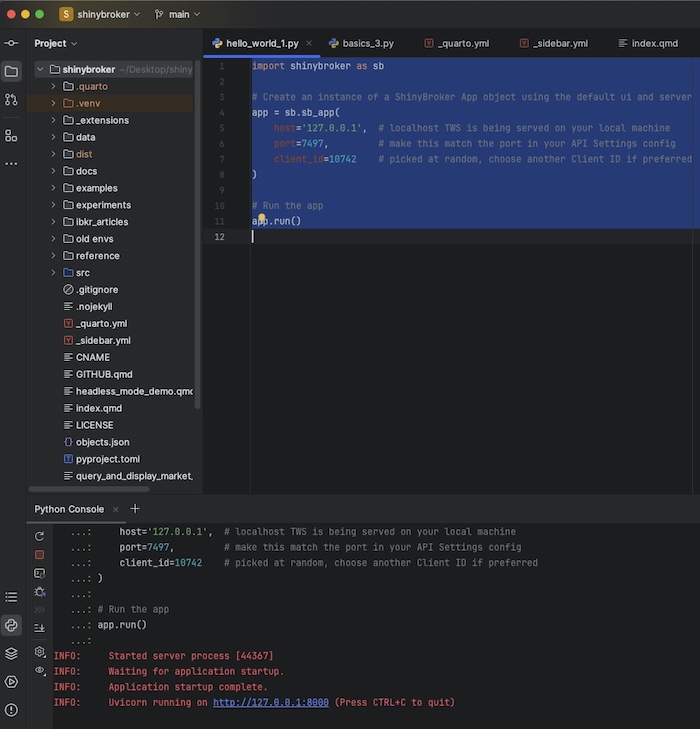
app.run()3. Run your Python script. There are many ways to do so, but one quick and easy way is to highlight all of the code in your script with “select all”, right-click the selection, and choose “Execute Selection in Python Console”. It’s even faster with keyboard shortcuts, e.g., for a Mac: command-A to select all, then alt-shift-E to execute. You can find those commands, and their shortcuts, by right-clicking on highlighted code in PyCharm.
4. After you execute the code PyCharm will launch a new Python console to run the code you told it to run. Your screen should look something like the below. You can see what the code you ran did: it created a ShinyBroker app object and told it where to find an IBKR connection by specifying host, port, and client_id. By itself, that app object does nothing but sit there in variable space; to make it run, you have to call its run method, which we did in the final line of the sample code when we called app.run(). That command is the one that started the continuously-running Python process that you see in your Console. That process serves your ShinyBroker app at the blue hyperlink appearing in the command line output. The app will continue to run until you tell it to stop (e.g., by clicking the red square in the Python Console in PyCharm).
5. To view your app, click the hyperlink in the command line output. Doing so will open your first ShinyBroker App in your default browser! You can also copy-paste the url into a browser of your choice. (And if you’re thinking can I serve the app on one computer and access the app via browser from another computer/phone in a different location the answer is “yes, you can”, but that’s a later topic)
Interact with the app and make note of a few important points.
When you navigate a browser to the url at which your app is being served, you should be greeted with an app that looks something like the screen snip below.

Take a few minutes to poke around in the app and try out some of the default tabs & tools provided for tasks involving market data, contract matching, socket messages from IBKR, and so on.
Especially important to note is the section on the home page, which currently reads no ui passed to sb_ui(). That space is special — it is reserved for you, the trader, to put UI elements and controls for your trading system. Since no ui was specified when we created this simple app object in this hello world example, ShinyBroker is telling you that it’s empty.
We’ll conclude this tutorial in the next step by injecting a little bit of ui into that space.
When you’re finished exploring the app and ready to move on, stop the app from running by clicking the red square button in the console tab in PyCharm.
You’re now ready for the final step in this tutorial in which you’ll add a bit of live, functional UI to your ShinyBroker app.
If you’re new to Shiny and reactive programming it is very highly recommended that you brush up on the basics by reviewing some of the very accessible and informative videos that the team at Posit has created to teach this topic. The video tutorial below, by Winston Chang of Posit, is an excellent place to start. As you watch, remember that anything you can build in Shiny, you can use in ShinyBroker.
Now it’s time for the real learning & takeaway part of this tutorial. Let’s take a minute to understand and appreciate that all user interfaces must necessarily operate on the same basic principle:
This tutorial culminates in the next step, which will show you how to implement this process using the magic of Shiny, which was written to greatly simplify the entire input -> processing -> output loop, making these kinds of systems much easier for the trader to build.
Our newly added ui will cause the ShinyBroker app to operate as follows:
To accomplish this feat we’ll need to add 3 new elements to our ShinyBroker app:
You can build just about anything you want starting from this humble example simply by keeping the “input -> processing -> output” data flow in your mind and making intelligent use of the buttons, widgets, plots, and other Python tools that are readily available in Shiny and other Python packages.
Please try the next step now.
First, we’ll need the two pieces of UI that will appear on the web page: an input for the user to type into, and an output to see the result. We’ll use the input_text and output_code objects made available by the ui object in Shiny, and store them together in a div, with the input on top of the output. All sorts of different components are available both in Shiny and in other packages like shinywidgets, or you can build your own. In this example, however, we’ll only need two components: input_text and output_code. In the code below we use these components to create a new piece of ui and assign to it the appropriate name a_piece_of_new_ui.
from shiny import ui

# Some UI to add to the app
a_piece_of_new_ui = ui.div(
    ui.input_text(
        id='sb_example_text_in',
        label='Example Input. Type something!'
    ),
    ui.output_code('sb_example_text_out')
)
Now we need some logic: a function that recognizes the input text box (which we named sb_example_text_in above) as an input that it needs to watch. It should also possess the additional properties such that, whenever the text in the input changes, the function executes, calculates the new string that we want for the text output, and sends that value to the output object that we named sb_example_text_out. ShinyBroker uses the Shiny framework (see the video above) to simplify of all the ‘watching and updating’ tasks in order to make it easy to write a function that does the job.
In Shiny-speak, what we want to write is called a rendering function, a special type of function that was created for exactly the kind of ‘watching and updating’ functionality that we need. A suitable rendering function is provided below but if you’re new to Shiny, consider the following bullet points to help you understand rendering functions and why the code is written the way it is so that you can be better equipped to write your own.
sb_example_text_out, so that’s the name we’ll assign to our function.sb_example_text_in changes, so somewhere within the function’s body we’ll need to call input.sb_example_text_in() to fetch the contents of the input box. Shiny handles the rest, which is extremely convenient because it allows you to treat input .sb_example_text_in() almost like a variable that you can always trust to contain “whatever is currently in the input box”. Note that calling an input function to get its value carries with it a computational expense, so if you find yourself making calls to the same input more than once within the same render function, it’s probably bad code. You’re most likely better off if you just make the call once, store the input’s value as a local variable, and then use that variable in the rest of your function code.@render decorator. All sorts of render decorators are available, and of course you can write your own, but we’ll be using @render.code so that the output text looks cool and monospaced-formatted like computer code. You can try stopping and re-running your app with other decorators like @render.text to see what happens with other sorts of decorators.Taking all that into account, a render function that suits our purposes might look like the one below:
    @render.code
    def sb_example_text_out():
        return f"You entered '{input.sb_example_text_in()}'."
All that’s left is to put that function into an app! Fortunately, ShinyBroker makes that easy. In practice, when making a real trading app, you will probably have tons of different functions required to make the app work, perhaps stored in different files, doing tasks like calculating your models, updating your charts, outputs, and so on. No matter how many you have, you can include all your functions in your app simply by wrapping them into one overall server function that you can pass to sb.sb_app() when you build your ShinyBroker app. It does not matter what you name your server function; the only requirement is that its signature contains the five parameters input: Inputs, output: Outputs, session: Session, ib_socket, sb_rvs. The part of your app that you, the trader, will write will not always, or even usually, make use all five parameters explicitly, but they need to be there in your server function so that ShinyBroker can keep track of session information in its internals.
Below, we do exactly that: wrap the render function we just wrote into a new server function named a_server_function.
from shiny import Inputs, Outputs, Session, ui, render

# Server to support the new UI
# Signature must always contain the following five parameters:
#   input, output, session, ib_socket, and sb_rvs
def a_server_function(
        input: Inputs, output: Outputs, session: Session, ib_socket, sb_rvs
):
    @render.code
    def sb_example_text_out():
        return f"You entered '{input.sb_example_text_in()}'."
And finally… here comes the magic of ShinyBroker. We can create a new ShinyBroker app by passing our ui and server functions as arguments to sb_app:
import shinybroker as sb

# Create a ShinyBroker app with the new ui and server
app = sb.sb_app(
    a_piece_of_new_ui,
    a_server_function,
    host='127.0.0.1',
    port=7497,
    client_id=10742
)
And that’s it! Altogether, the fully completed code example, including app.run(), can be found below:
import shinybroker as sb
from shiny import Inputs, Outputs, Session, ui, render
# Some UI to add to the app
a_piece_of_new_ui = ui.div(
ui.input_text(
id='sb_example_text_in',
label='Example Input. Type something!'
),
ui.output_code('sb_example_text_out')
)
# Server to support the new UI
# Signature must always contain the following five parameters:
# input, output, session, ib_socket, and sb_rvs
def a_server_function(
input: Inputs, output: Outputs, session: Session, ib_socket, sb_rvs
):
@render.code
def sb_example_text_out():
return f"You entered '{input.sb_example_text_in()}'."
# Create a ShinyBroker app with the new ui and server
app = sb.sb_app(
a_piece_of_new_ui,
a_server_function,
host='127.0.0.1',
port=7497,
client_id=10742
)
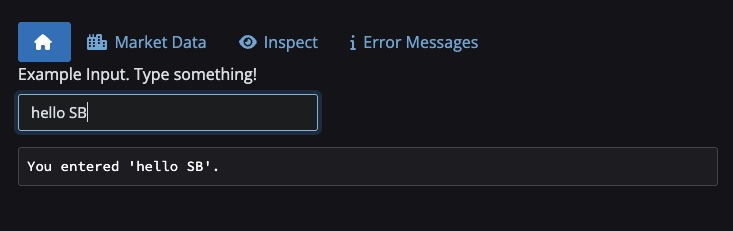
app.run()Run your app and view it in a browser like you did in Step 4. You should see something like the below in your Home tab, and the output should update with whatever you type into the input:
This concludes the first ShinyBroker Tutorial! To recap, we:
In the next installment, we’ll be fetching, analyzing, and charting market data.
Information posted on IBKR Campus that is provided by third-parties does NOT constitute a recommendation that you should contract for the services of that third party. Third-party participants who contribute to IBKR Campus are independent of Interactive Brokers and Interactive Brokers does not make any representations or warranties concerning the services offered, their past or future performance, or the accuracy of the information provided by the third party. Past performance is no guarantee of future results.
This material is from ShinyBroker and is being posted with its permission. The views expressed in this material are solely those of the author and/or ShinyBroker and Interactive Brokers is not endorsing or recommending any investment or trading discussed in the material. This material is not and should not be construed as an offer to buy or sell any security. It should not be construed as research or investment advice or a recommendation to buy, sell or hold any security or commodity. This material does not and is not intended to take into account the particular financial conditions, investment objectives or requirements of individual customers. Before acting on this material, you should consider whether it is suitable for your particular circumstances and, as necessary, seek professional advice.
Please keep in mind that the examples discussed in this material are purely for technical demonstration purposes, and do not constitute trading advice. Also, it is important to remember that placing trades in a paper account is recommended before any live trading.
The order types available through Interactive Brokers LLC's trading platforms are designed to help you limit your loss and/or lock in a profit. Market conditions and other factors may affect execution. In general, orders guarantee a fill or guarantee a price, but not both. In extreme market conditions, an order may either be executed at a different price than anticipated or may not be filled in the marketplace.
For specific platform feedback and suggestions, please submit it directly to our team using these instructions.
If you have an account-specific question or concern, please reach out to Client Services.
We encourage you to look through our FAQs before posting. Your question may already be covered!


What is the status of shinybroker?